Git Commands Simplified: A Beginner’s Guide
Introduction
Git, the popular version control system, is an essential tool for developers and anyone working with code. In this comprehensive guide, we will delve into the fundamental Git commands, demystifying their purpose and providing practical examples. Whether you’re new to Git or looking to enhance your understanding, this blog post will equip you with the knowledge needed to navigate your projects with confidence.
Initialization
git init: Creating a new Git repository
Use the git init command to create a new, empty repository in the current directory.
$ git init
Running this command creates a hidden .git directory. This .git directory is the brain/storage center for the repository. It holds all of the configuration files and directories and is where all of the commits are stored.
git config: Customizing Git configuration settings
The “git config” command allows you to customize various Git configuration settings. These settings can be specific to your user account or applied to a particular Git repository.
To set your name and email address for commits:
$ git config --global user.name "Your Name"
$ git config --global user.email "your.email@example.com"
These global configurations will be used for all your Git repositories unless overridden at the repository level.
To view your Git configurations:
$ git config --list
This will display all the configurations currently set on your system.
To configure settings at the repository level:
$ git config user.name "Your Name"
$ git config user.email "your.email@example.com"
By omitting the “–global” flag, these settings will be specific to the current repository.
Additionally, you can configure other settings such as preferred text editors, default branch names, and merge conflict resolution tools using the “git config” command.
Remember, customizing Git configurations can enhance your workflow and improve the accuracy of your commit information. Take advantage of these configurations to make Git work seamlessly for you.
Basic Operations
git add: Adding files to the staging area
The git add command is used to move files from the Working Directory to the Staging Index.
$ git add <file1> <file2> … <fileN>
This command:
- takes a space-separated list of file names
- alternatively, the period . can be used in place of a list of files to tell Git to add the current directory (and all nested files)
git commit: Committing changes to the repository
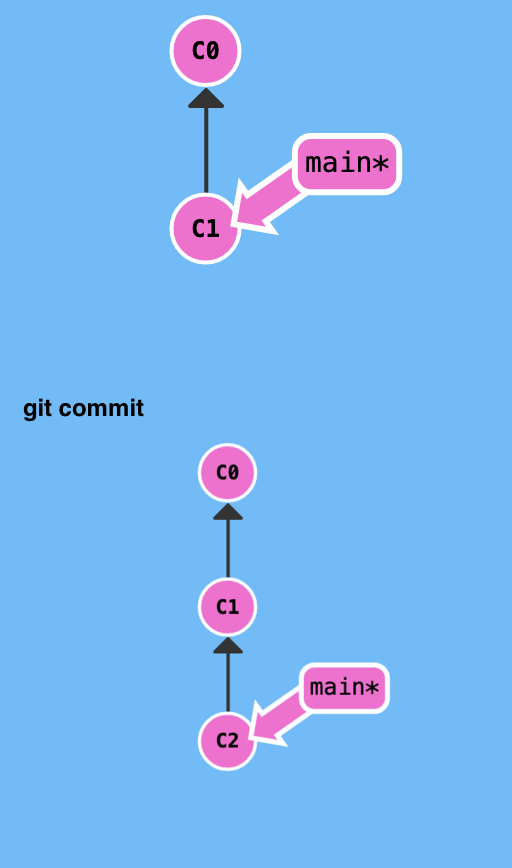
- commit in a git repository records a snapshot of all the (tracked) files in your directory
- like a giant copy and paste, but even better!
- commits as lightweight as possible though, so it doesn’t just blindly copy the entire directory every time you commit
git status: Checking the status of files
The git status command will display the current status of the repository.
$ git status
I can’t stress enough how important it is to use this command all the time as you’re first learning Git. This command will:
- tell us about new files that have been created in the Working Directory that Git hasn’t started tracking, yet
- files that Git is tracking that have been modified
- and a whole bunch of other things that we’ll be learning about throughout the rest of this article ;-)
git log: Viewing commit history
The git log command is used to display all of the commits of a repository.
$ git log
By default, this command displays:
- the SHA
- the author
- the date
- and the message
…of every commit in the repository. I stress the “By default” part of what Git displays because the git log command can display a lot more information than just this.
Git uses the command line pager, Less, to page through all of the information. The important keys for Less are:
- to scroll down by a line, use j or ↓
- to scroll up by a line, use k or ↑
- to scroll down by a page, use the spacebar or the Page Down button
- to scroll up by a page, use b or the Page Up button
- to quit, use q
Branching and Merging:
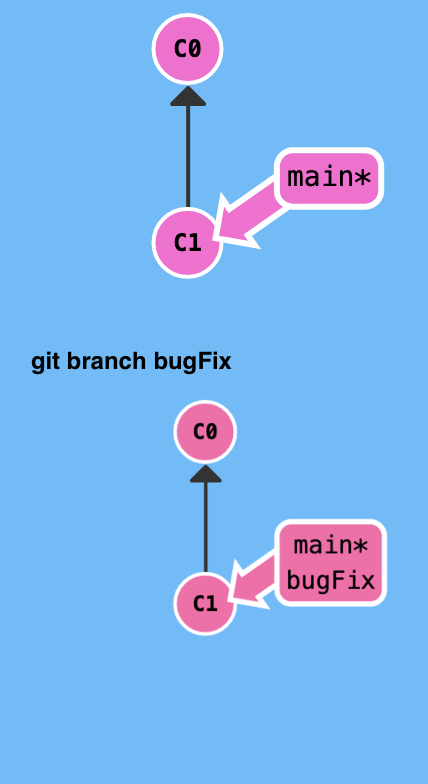
git branch: Creating and managing branches
- simply pointers to a specific commit – nothing more. branch early, and branch often
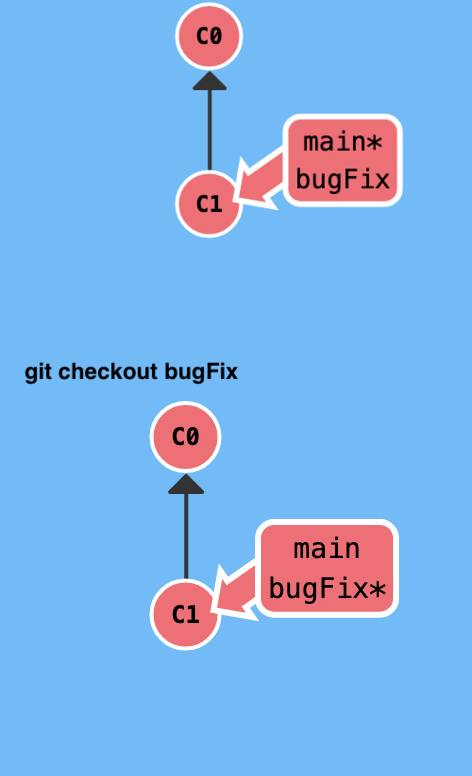
git checkout: Switching between branches
- put us on the new branch before committing our changes
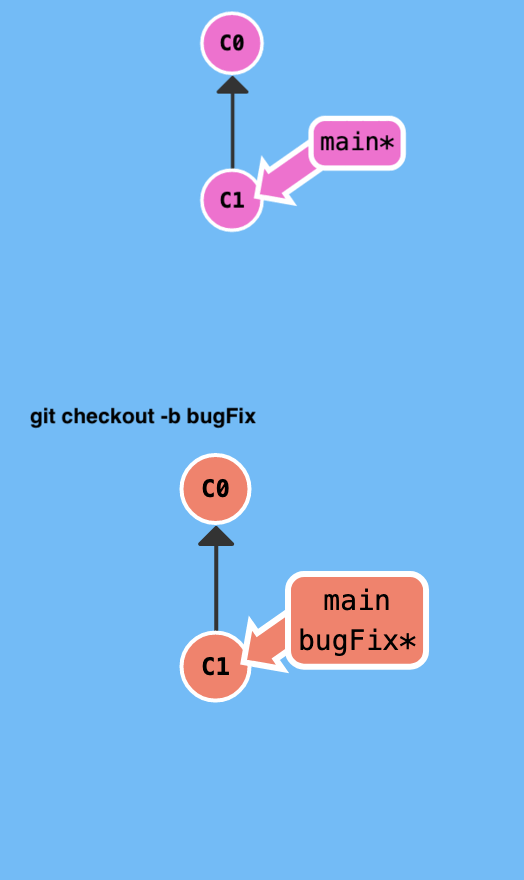
git checkout -b [yourbranchname]: Creating new branch and Switching to it
- create a new branch AND check it out at the same time
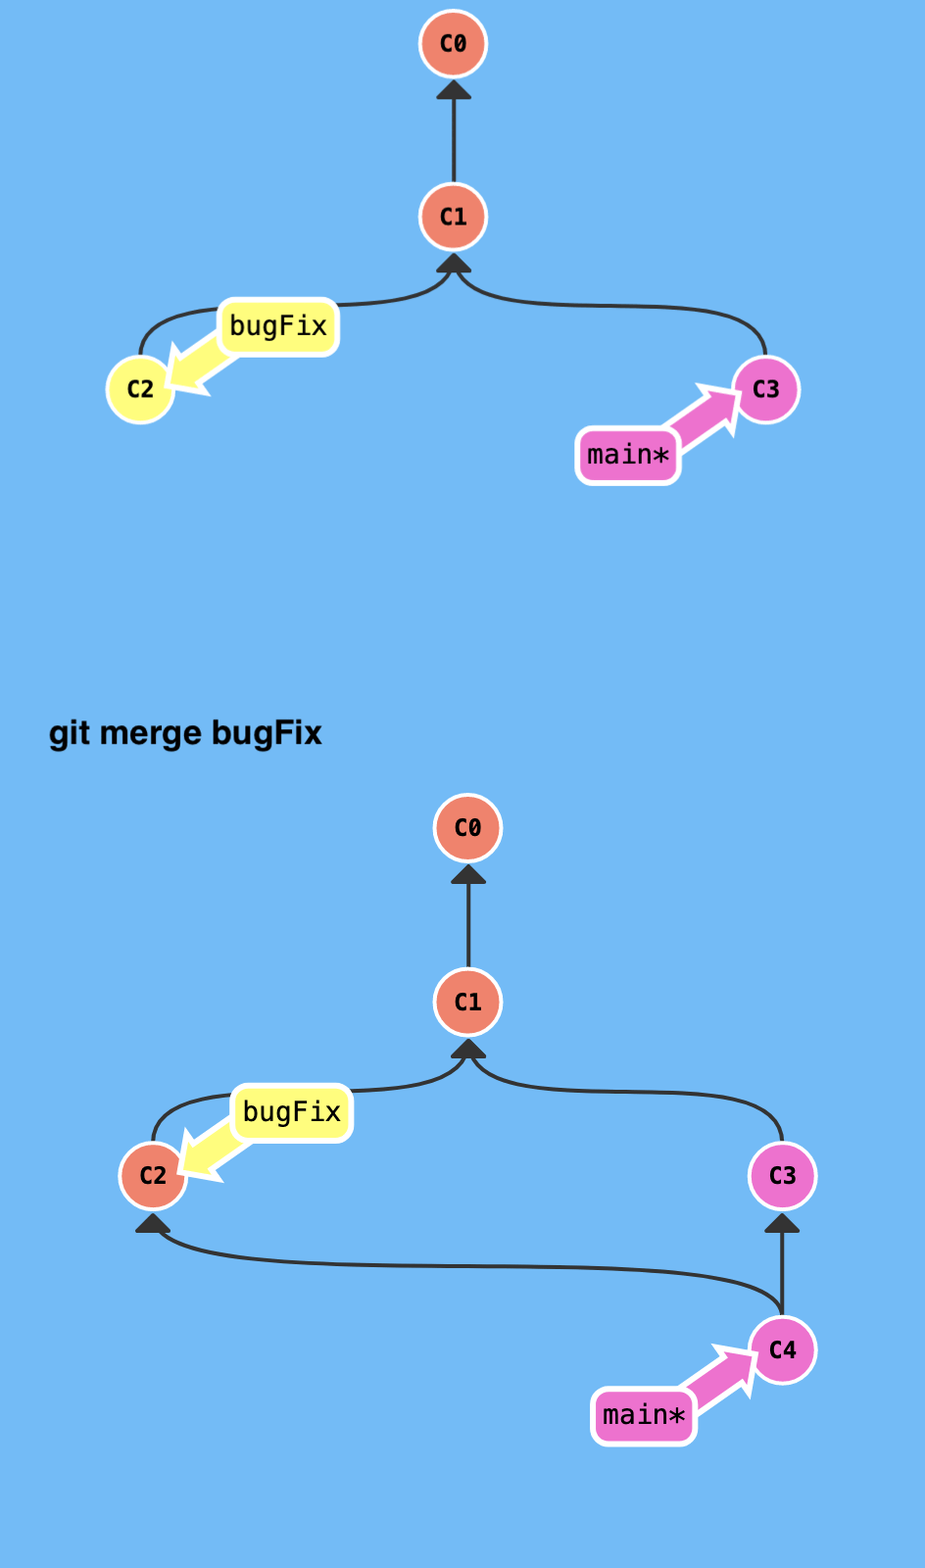
git merge: Combining branches
- Merging in Git creates a special commit that has two unique parents
Collaboration and Remote Repositories
git clone: Cloning a remote repository
The git clone command is used to create an identical copy of an existing repository.
$ git clone <path-to-repository-to-clone>
This command:
- takes the path to an existing repository
- by default will create a directory with the same name as the repository that’s being cloned
- can be given a second argument that will be used as the name of the directory
- will create the new repository inside of the current working directory
git pull: Updating your local repository with remote changes
- The “git pull” command is used to update your local repository with the latest changes from a remote repository. - It combines the “git fetch” command, which retrieves the changes, and the “git merge” command, which incorporates those changes into your local branch.
git push: Pushing your local changes to a remote repository
- The “git push” command is used to upload your local commits to a remote repository, making them accessible to others.
- It updates the remote repository with your latest changes.
git remote: Managing remote repositories
The “git remote” command allows you to manage remote repositories associated with your local repository. It helps you view, add, rename, or remove remote repositories.
To view the remote repositories:
$ git remote -v
This command displays a list of remote repositories along with their URLs.
To add a remote repository:
$ git remote add <remote-name> <remote-url>
This command associates a remote repository with a name and a URL.
To rename a remote repository:
$ git remote rename <old-name> <new-name>
This command changes the name of an existing remote repository.
To remove a remote repository:
$ git remote remove <remote-name>
This command removes the association of a remote repository from your local repository. These commands help you interact with remote repositories, facilitating collaboration and keeping your local and remote repositories in sync.
Advanced Git Commands
HEAD
- HEAD is the symbolic name for the currently checked out commit
- it’s essentially what commit you’re working on top of.
- HEAD always points to the most recent commit which is reflected in the working tree.
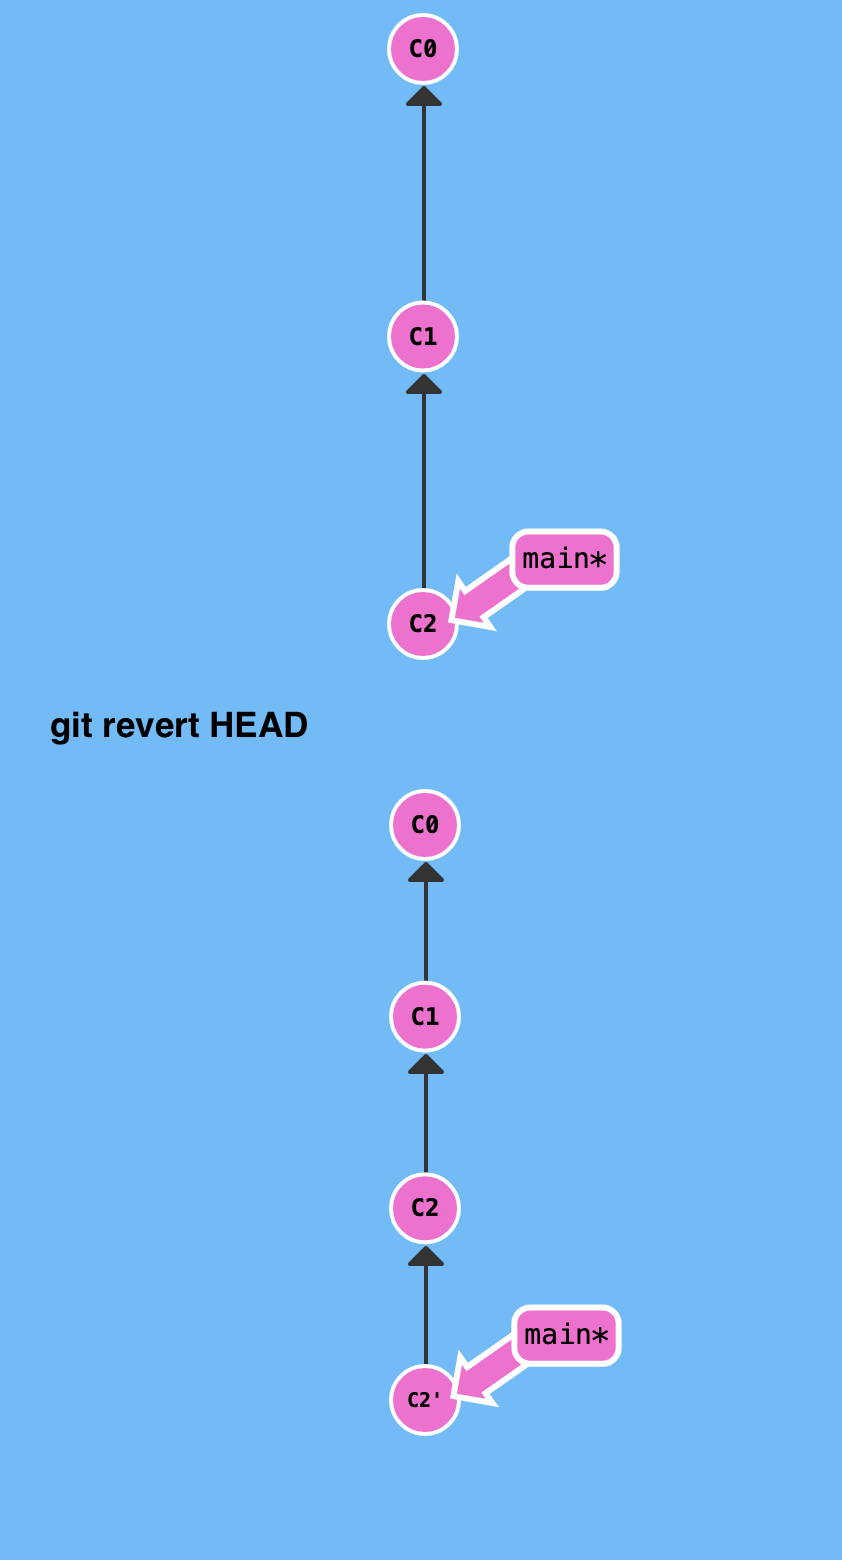
git revert:
- git reset doesn’t work for remote branches that others are using.
- In order to reverse changes and share those reversed changes with others, we need to use git revert.
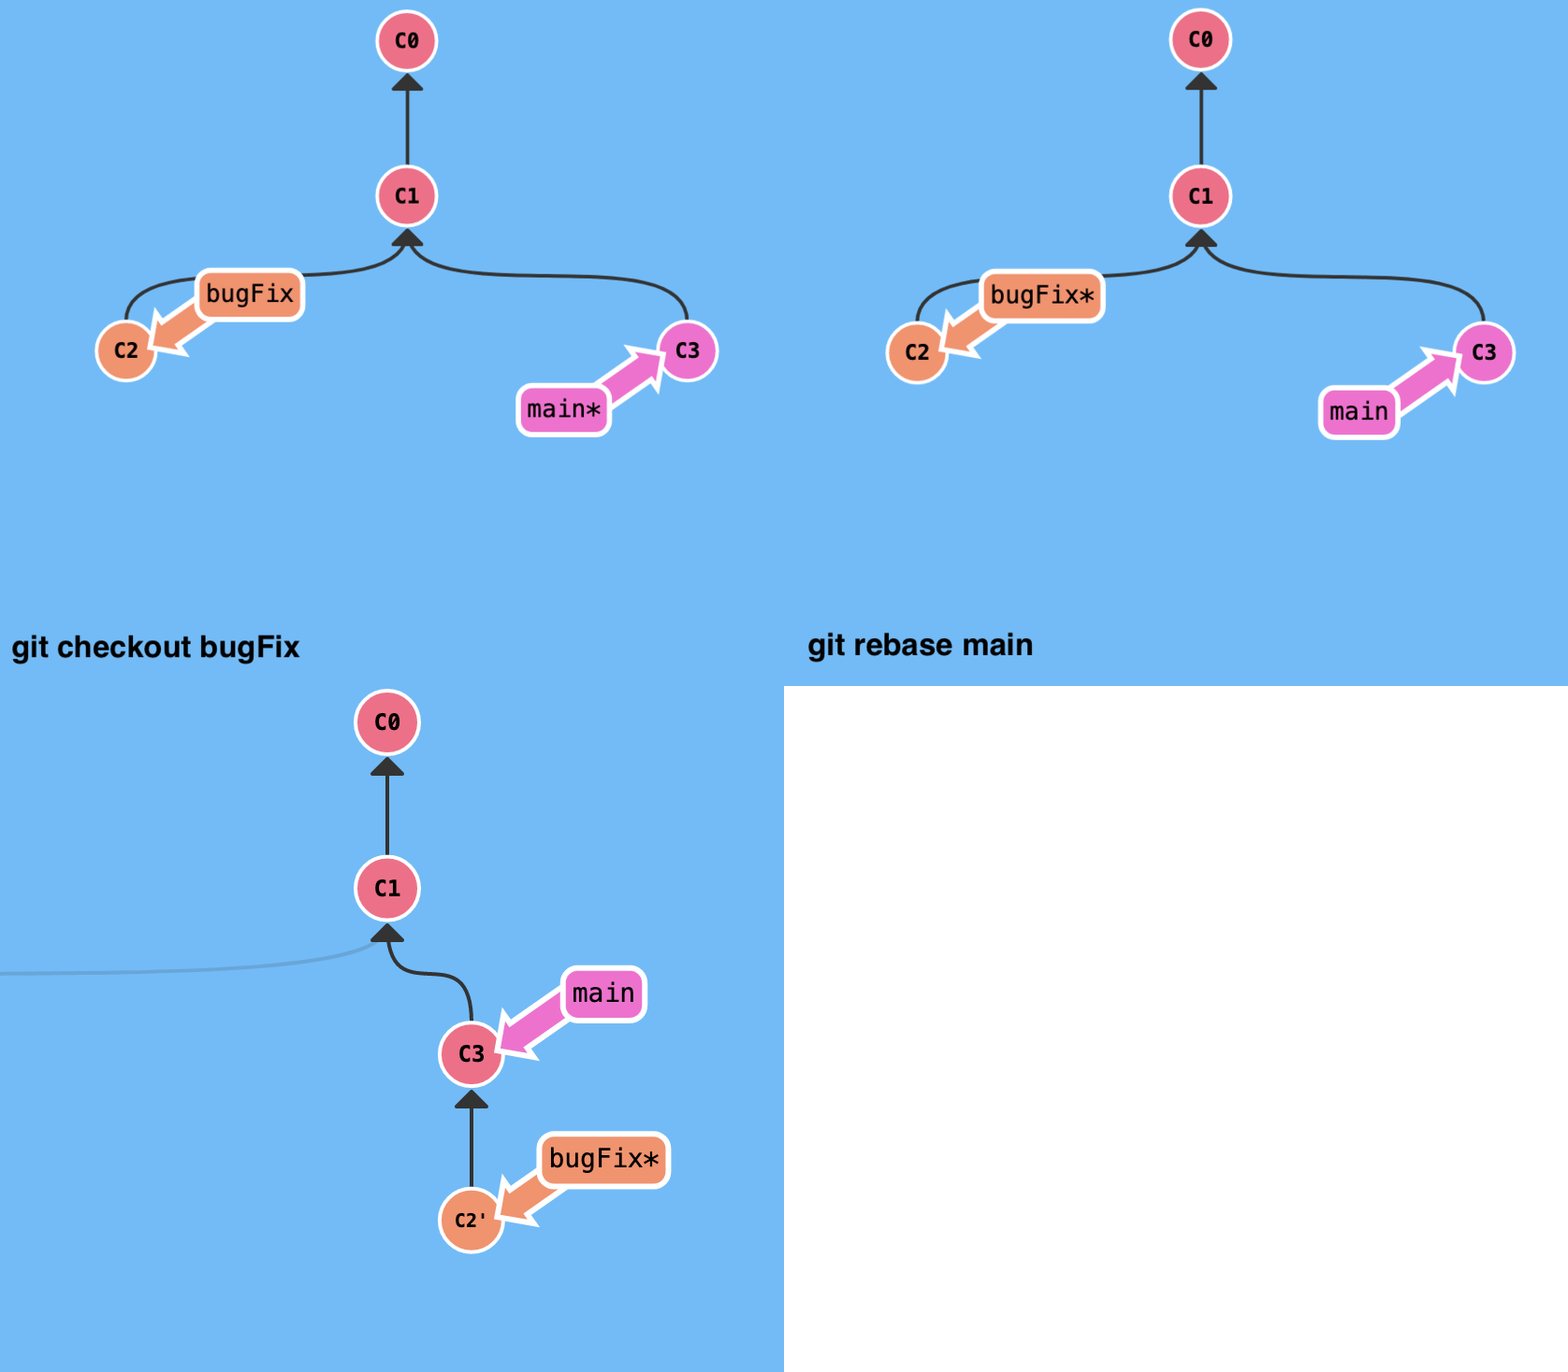
git rebase: Modifying commit history
- Rebasing essentially takes a set of commits, “copies” them, and plops them down somewhere else
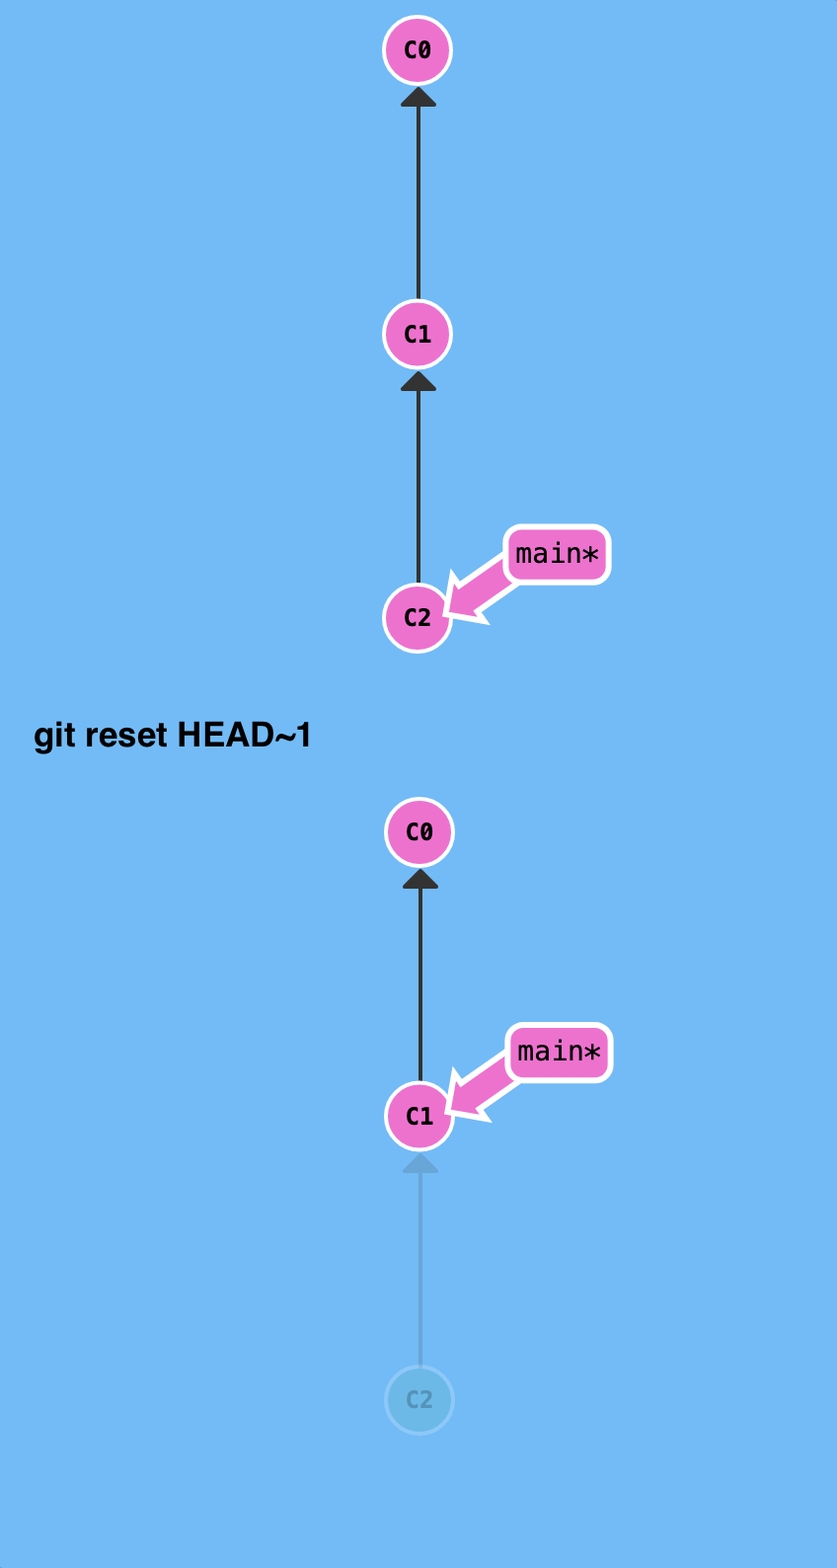
git reset: Undoing changes and moving the HEAD pointer
- reverses changes by moving a branch reference backwards in time to an older commit
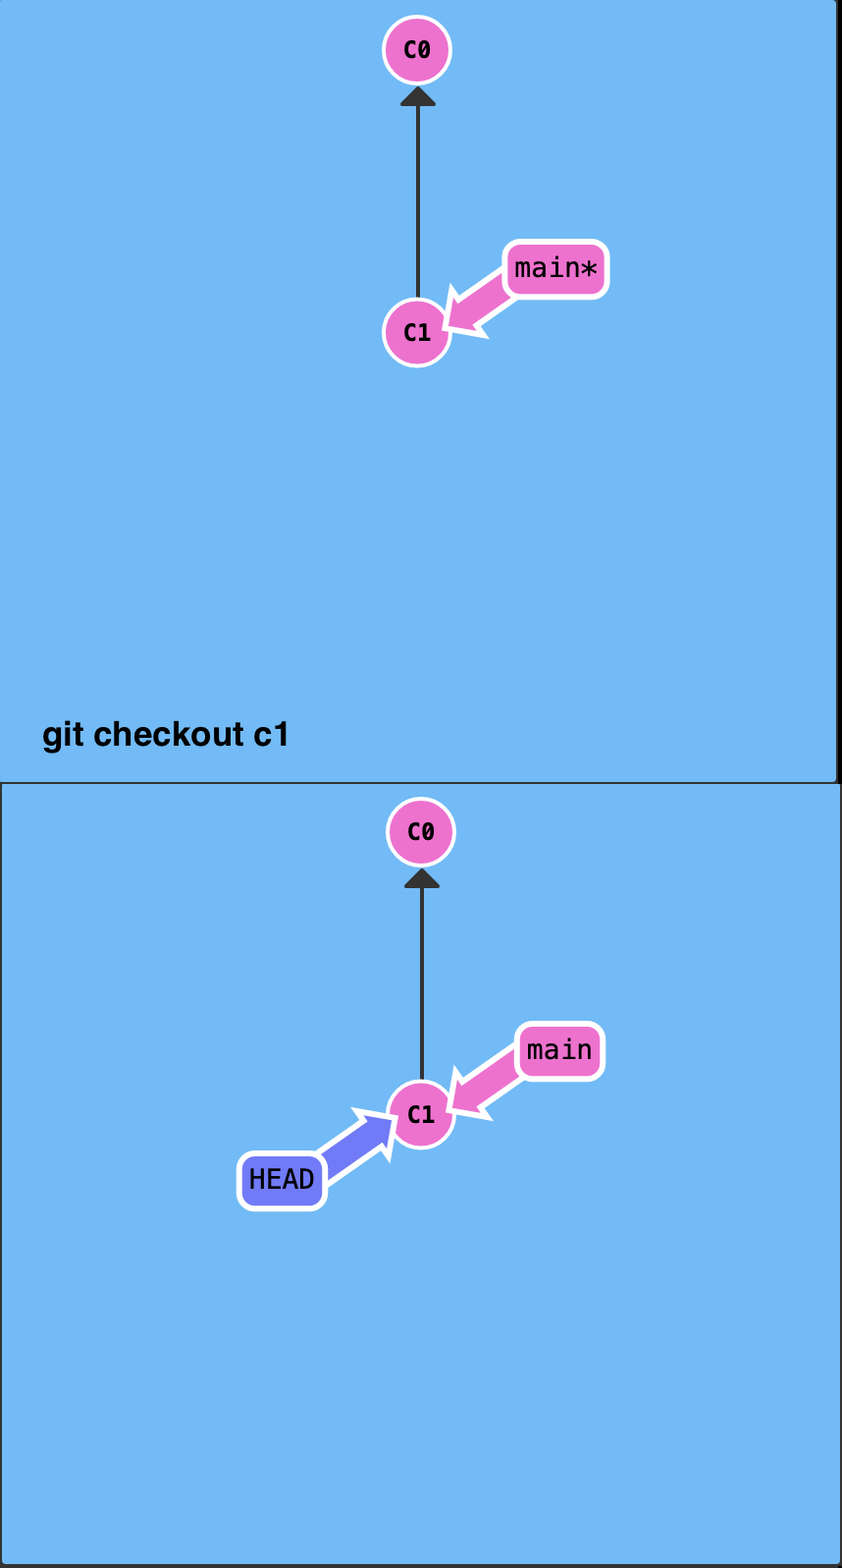
detach head:
- Detaching HEAD just means attaching it to a commit instead of a branch.
- To detach simply specify checkout by its hash
Relative commits:
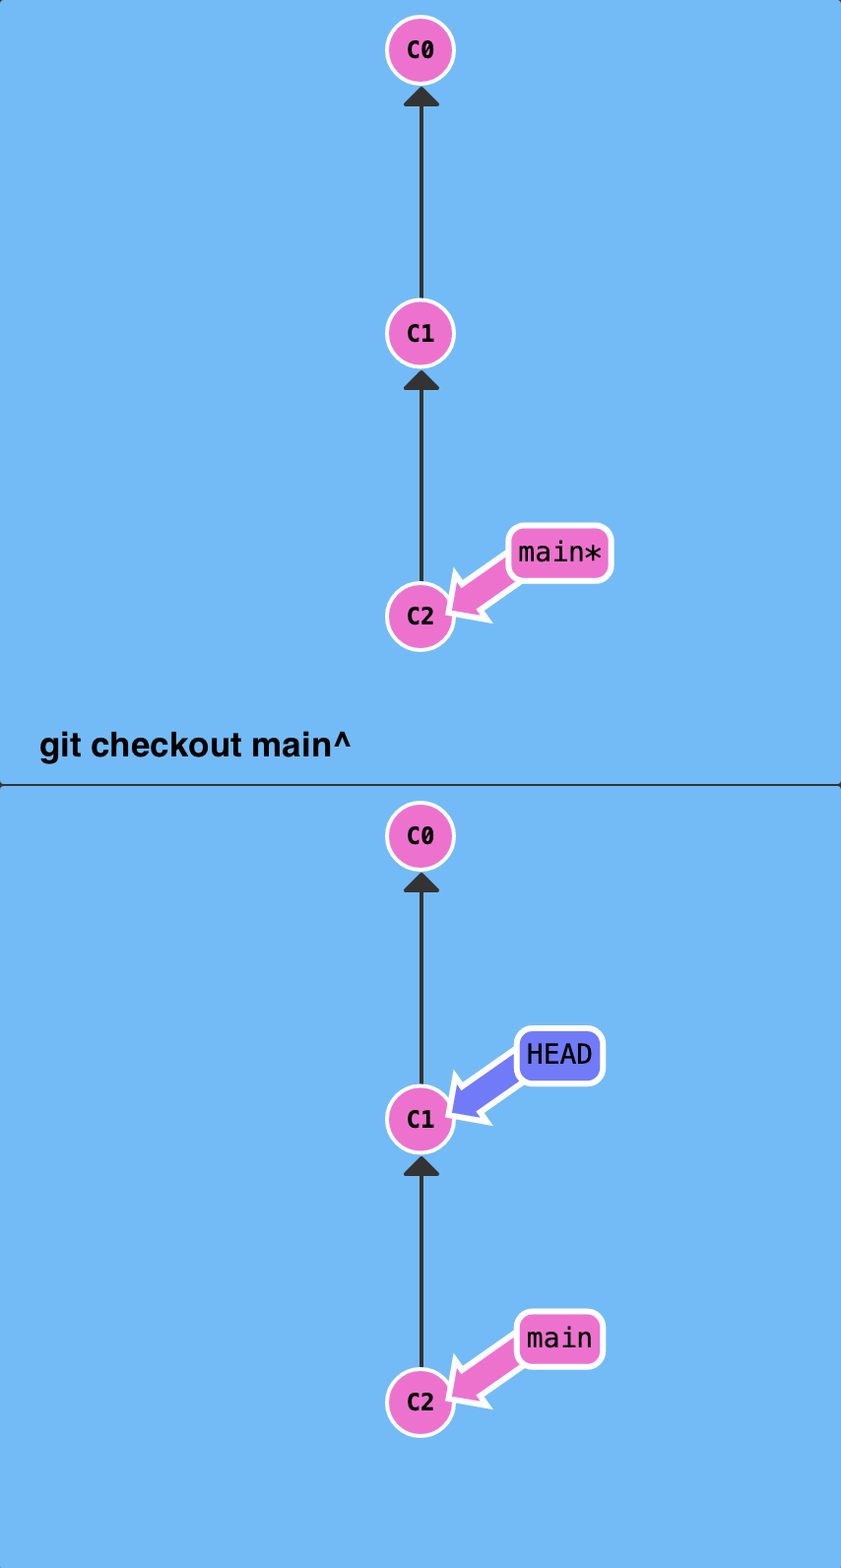
Caret (^) operator:
- Moving upwards one commit at a time with ^
- Each time you append that to a ref name, you are telling Git to find the parent of the specified commit.
- saying main^ is equivalent to “the first parent of main”
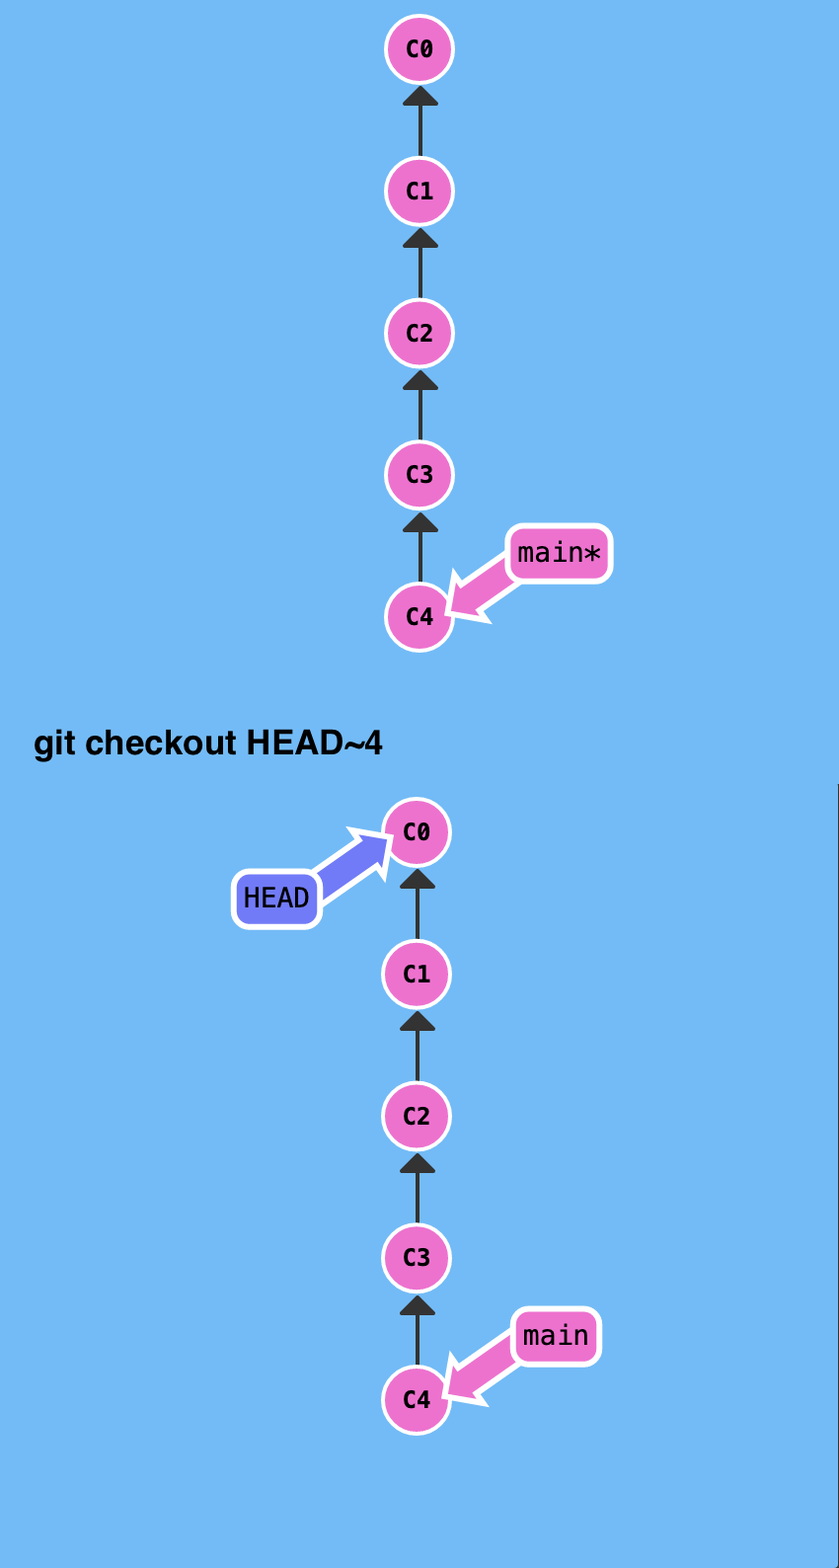
tilde (~) operator:
- Moving upwards a number of times with ~
- tilde operator (optionally) takes in a trailing number that specifies the number of parents you would like to ascend
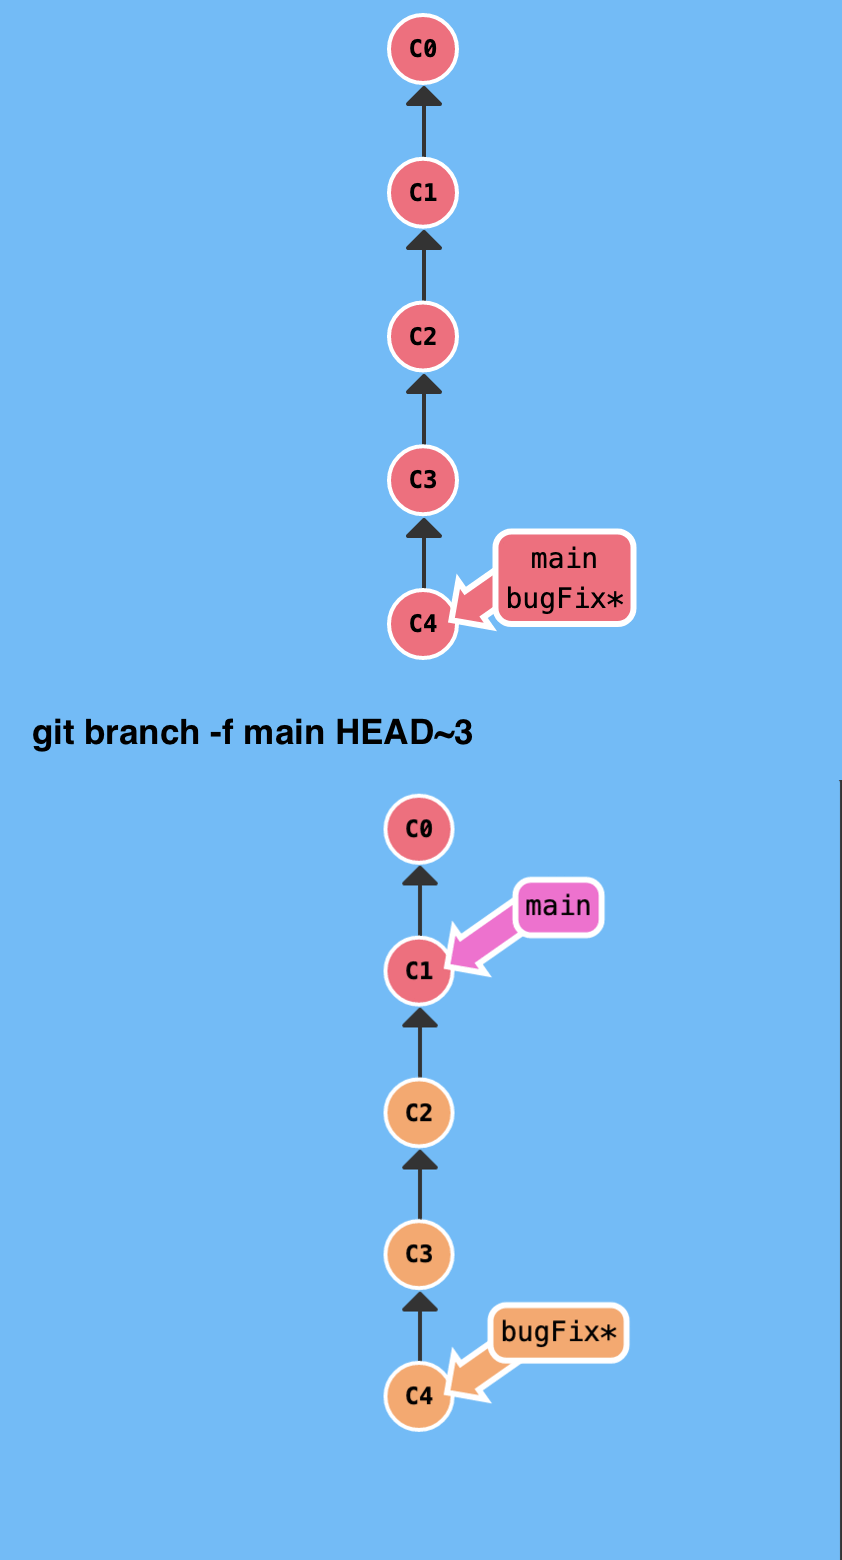
branch by force(-f):
- You can directly reassign a branch to a commit with the -f option
Conclusion
Understanding the core Git commands is essential for efficient collaboration, version control, and project management. By familiarizing yourself with these commands, you’ll gain the confidence to navigate Git repositories, resolve conflicts, and streamline your development workflow. Embrace the power of Git and elevate your coding journey with these fundamental commands.
Remember, practice makes perfect when it comes to Git. Don’t hesitate to experiment with these commands in a test repository to deepen your understanding and discover their full potential. Happy coding with Git!
References
Twitter Facebook LinkedIn

Comments