Building my Personal Site with Jekyll & Minimal Mistakes
Prelude
With my job as PS consultant, I had no projects to host on github. I love writing and I wanted to write about the books I read or other occassional inspirations I get from random things. Ever since I thought about having a blog, my friend has been recommending me to start a github blog over wordpress so that I can have my software projects hosted as well. I went along the easier path with wordpress and had my wordpress site opened in some time in 2019 where I occassionally try to write.
Things changed when I took up OMSCS in 2020. I could understand why anyone would want to have their github site - to showcase their portfolio, projects, share articles they learnt. I finally wanted to build one github site for myself and been putting it off due to the MS assignments. Now that am closer to the end of my course, I googled on github blogs and started my own site. After a few articles, I understood, each person has their own journey in starting up github blogs. In this article, am documenting my journey, the struggles I faced and the changes I did to the site that represents my personality.
Github Pages
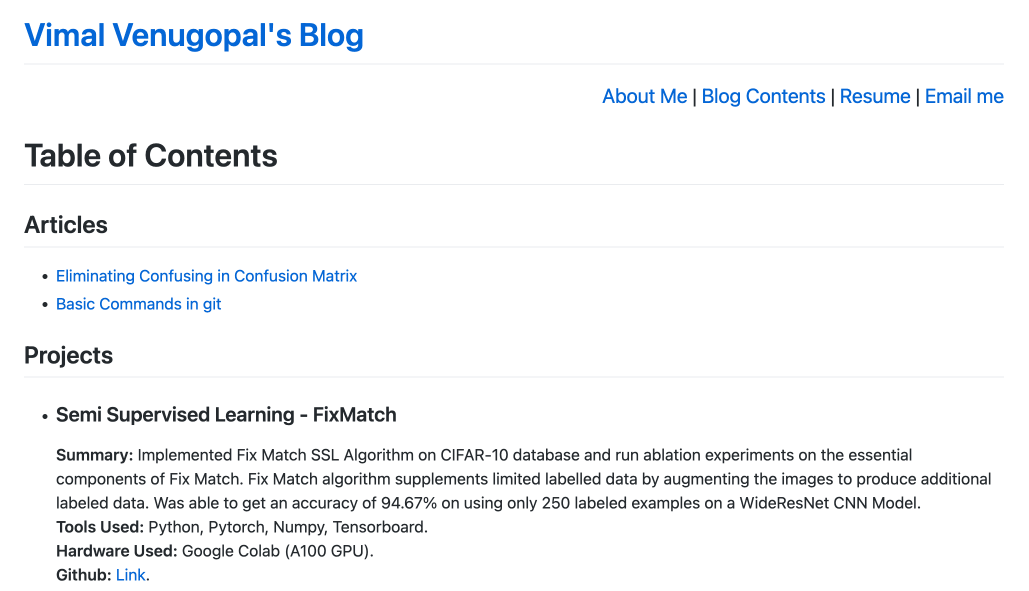
The best thing about having a blog with Github pages is that it automatically hosts your pages which you can access with your own personal URL anywhere in the world. All within a few minutes. How cool is that! The instructions to host your github pages were explained pretty consicely in the github pages site. You cannot go wrong in that. I had my site up in a few minutes using plain markdown syntax. There was nothing fancy going on as I had no themes enabled since I didnt understand what was going on beneath the blackbox that caused different things which I didnt add in my website to popup. This is how my blog looked when I first created it in plain markdown syntax on github pages following the instructions from github pages quickstart guide.
Installing Jekyll
For sometime, I kept blogging github pages with plain .md files, but wanted to have a proper workflow and add more beautification to my site like other people did. I noticed most of the blogs I follow were using Minimal Mistakes theme. I realized Jekyll was the technology behind converting .md files to static html webpages and a pre-requisite for Minimal Mistakes theme. I tried installing Jekyll on my laptop by following the official Jekyll guide. However, I could not get past installing ruby as the preinstalled ruby on macOS kept conflicting with new install. After exhausting multiple recommendations, I finally tookup the step of upgrading macOS from BigSur to Ventura per this very helpful install ruby on MacOS article by Moncef. The rest of Moncef article helped resolved all my issues and I finally got Jekyll running on my laptop.
Some of the instructions require you to update the system’s bash file. There are multiple bashes and I had trouble deciding which bash to update. You may find the following commands helpful.
- To determine the shell you are currently using in a terminal or command prompt, you can use the following command:
echo $SHELLThis command will display the path to the shell executable that is currently being used as your default shell. The output will typically be the absolute path to the shell, such as /bin/bash, /bin/zsh, or /bin/sh.
- To update Bash file
nano ~/.bash_profileIf you run into “Permission denied” error message indicates that you do not have the necessary permissions to edit the .bash_profile file. In this case, you can try using the sudo command to edit the file with elevated privileges.
Here’s an example command to open the .bash_profile file with sudo and the Nano editor:
sudo nano ~/.bash_profile
Choose either ~/.bashrc or ~/.bash_profile based on your preference and the one that is being sourced by your Bash shell.
Understanding Github & Jekyll
Once I had Jekyll, I was in search of an article that best explained what was going on. After searching multiple resources, I hit upon Bill’s awesome 6 part Youtube series (Thank you Bill Raymond!). He takes it slow and clearly explains how github pages work, Jekyll theme is setup, how github’s remote Jekyll works and more. If you are following this article, I sincerely urge you to watch Bill’s videos. Bill covers exactly what I wanted. Understanding the basics, Customizing the theme and setting up a workflow with Visual Studio Code. Below are some of the useful commands I learnt from Bill’s videos.
To create a new Jekyll site in the working folder, you can use the following command:
jekyll new .
This command will generate a new Jekyll site in the current directory.
If you already have files in the working folder and want to force the creation of a new site, you can use the --force option. This will overwrite any existing files that conflict with the Jekyll site structure. Here’s the command:
jekyll new . --force
To test your site with the Live Reload option, you can use the bundle exec jekyll serve --livereload command. This command starts a local Jekyll server and automatically refreshes the browser whenever you make changes to your site files. Here’s the command:
bundle exec jekyll serve --livereload
If you want to run your local Jekyll server in a production environment, you can set the JEKYLL_ENV environment variable to “production” before starting the server. This will enable optimizations and configurations specific to production. Here’s the command:
JEKYLL_ENV=production bundle exec jekyll serve
By running the above command, Jekyll will start the server in a production environment, using the appropriate settings and configurations for that environment.
To manage dependencies in a Jekyll project, you can use Bundler. Bundler helps install and update the required gems (Ruby libraries) specified in your project’s Gemfile.
To install the required gems for your Jekyll project, use the bundle install command. This command reads the Gemfile in your project’s root directory and installs the specified gems. Here’s the command:
bundle install
If you have already installed the gems and want to update them to their latest versions, you can use the bundle update command. This command updates the gems specified in your Gemfile to their latest versions. Here’s the command:
bundle update
Both bundle install and bundle update should be run in the root directory of your Jekyll project, where the Gemfile is located. These commands ensure that your project has the necessary dependencies installed and up to date.
To open the Minima theme in macOS, you can use the open command followed by the path to the theme. Here are the commands for opening the Minima theme and the Minimal Mistakes Jekyll theme:
To open the Minima theme:
open $(bundle info --path minima)
This command uses bundle info --path minima to get the path to the Minima theme and then opens it using the open command.
To open the Minimal Mistakes Jekyll theme:
open $(bundle info --path minimal-mistakes-jekyll)
This command uses bundle info --path minimal-mistakes-jekyll to get the path to the Minimal Mistakes Jekyll theme and then opens it using the open command.
Running Locally
I found it extremely convenient to do bundle update and bundle exec jekyll serve from Visual Studio, so I can render my blog from my local without having to publish it each time on github. However, one problem I often ran into was the local port kept being occupied and failed my exec jekyll serve commands.
jekyll 3.9.3 | Error:  Address already in use - bind(2) for 127.0.0.1:4000
/Users/vimal/.rubies/ruby-3.1.3/lib/ruby/3.1.0/socket.rb:201:in `bind': Address already in use - bind(2) for 127.0.0.1:4000 (Errno::EADDRINUSE)
You can get around the issue by finding out the Process ID used by the local port (4000) and then killing the process by Process ID. I ended up using the below two commands often. To show what is using port 4000:
lsof -wni tcp:4000
Then use the PID that comes with the result to run the kill process:
kill -9 3366
Mimimal Mistakes
To get to know the minimal mistakes theme, I would recommend going through the excellent quick-start-guide put together by Michael. This is better over forking since you can keep track of the exact changes you are applying. The customization section help you setup the basics and getting to know your config.yaml file.
Customizations
Some of the customizations are not exposed through the config file. In those cases you can copy over the theme files and edit the source files directly. Bill’s video series already covers this in detail. In addition, I hugely benefited from these series of articles by Katerina on her website cross-validated. (Thanks Katerina!) Once you get a hang of making these changes, you can explore on your own and customize your site as you wish.
Conclusion
Building your own blog site can be a hugely rewarding experience. I also realized how far web development has come and how various technologies can interact and work together. I know I did not go into the specifics but the people in the articles I have linked have already covered this in great detail. I also did not go far into building my custom domain since I dont see the need for it yet. Feel free to comment if you have any specific question. Enjoy building your website!
Twitter Facebook LinkedIn

Comments