
MiniProject: Emotion Classifier - Part1
Introduction
This is part 1 of my miniproject series on building a human emotion classifier. In this project we are going to using a basic CNN model resnet34 that was already pre-trained on ImageNet database. We are also going to apply transfer learning to fine-tune the model using images downloaded from the internet. We will be using the FastAI Deep learning library to implement this project.
In this part 1 of the series, we will look at how we can basically setup our problem and consume a pretrained CNN and apply transfer learning to train classifier to solve our problem. In part2, we will look at how we can augment existing data to produce more data, clean our data to improve our model’s performance and finally export our fine tuned model as a pickle for deployment. Finally, in part 3, we will look at how we can deploy the exported pickle file in sort of a production environment and provide an interface for the consumer.
Basic Steps
The basic steps we’ll take are:
- Use DuckDuckGo to search for images of “happy humans”
- Use DuckDuckGo to search for images of “sad humans”
- Fine-tune a pretrained neural network to recognise these two groups
- Try running this model on a happy human and see if it works.
We can also try out feeding different emotions to the classifier and try to determine what emotions the classifier thinks as happy
Step 1: Download images of happy and sad people
First lets run this pip code so the latest versions of the fastai and duckduckgo_search packages will be installed (or upgraded if they are already installed) in your Python environment
# `!pip install -Uqq <libraries>` upgrades to the latest version of <libraries>
!pip install -Uqq fastai duckduckgo_search
[2K [90m━━━━━━━━━━━━━━━━━━━━━━━━━━━━━━━━━━━━━━━━[0m [32m75.4/75.4 kB[0m [31m2.4 MB/s[0m eta [36m0:00:00[0m
[2K [90m━━━━━━━━━━━━━━━━━━━━━━━━━━━━━━━━━━━━━━━━[0m [32m74.5/74.5 kB[0m [31m6.4 MB/s[0m eta [36m0:00:00[0m
[2K [90m━━━━━━━━━━━━━━━━━━━━━━━━━━━━━━━━━━━━━━━━[0m [32m2.7/2.7 MB[0m [31m28.0 MB/s[0m eta [36m0:00:00[0m
[2K [90m━━━━━━━━━━━━━━━━━━━━━━━━━━━━━━━━━━━━━━━━[0m [32m57.5/57.5 kB[0m [31m2.7 MB/s[0m eta [36m0:00:00[0m
[2K [90m━━━━━━━━━━━━━━━━━━━━━━━━━━━━━━━━━━━━━━━━[0m [32m58.3/58.3 kB[0m [31m5.7 MB/s[0m eta [36m0:00:00[0m
[?25h
Let’s start by searching for a happy human photo and seeing what kind of result we get.
First we will create function to search_images.
from duckduckgo_search import ddg_images
from fastcore.all import *

def search_images(term, max_images=30):
    print(f"Searching for '{term}'")
    return L(ddg_images(term, max_results=max_images)).itemgot('image')
Code Explanation:
-
Import libraries: The function imports the
ddg_imagesfunction from theduckduckgo_searchlibrary and all modules from thefastcorelibrary. - Define the
search_imagesfunction: This function takes two arguments:term: The search term for which images are to be searched.max_images: The maximum number of images to retrieve (default is 30).
-
Search for images: The function prints a message indicating that it’s searching for images with the given search term. It then calls the
ddg_imagesfunction with the provided search term and maximum number of images. Theddg_imagesfunction returns a list of dictionaries, where each dictionary contains information about an image, including the image URL. -
Extract image URLs: The function uses the
fastcorelibrary’sLfunction to create a list-like object from the list of dictionaries. Theitemgotmethod is then used to extract the ‘image’ key from each dictionary, which contains the URL of the corresponding image. - Return the image URLs: The function returns the list of image URLs found during the search.
Lets run the function and take a look at the URL
#NB: `search_images` depends on duckduckgo.com, which doesn't always return correct responses.
#    If you get a JSON error, just try running it again (it may take a couple of tries).
urls = search_images('happy human', max_images=1)
urls[0]
Searching for 'happy human'


/usr/local/lib/python3.10/dist-packages/duckduckgo_search/compat.py:60: UserWarning: ddg_images is deprecated. Use DDGS().images() generator
  warnings.warn("ddg_images is deprecated. Use DDGS().images() generator")
/usr/local/lib/python3.10/dist-packages/duckduckgo_search/compat.py:64: UserWarning: parameter page is deprecated
  warnings.warn("parameter page is deprecated")
/usr/local/lib/python3.10/dist-packages/duckduckgo_search/compat.py:66: UserWarning: parameter max_results is deprecated
  warnings.warn("parameter max_results is deprecated")


'http://www.personalenrichmentcenter.com/wp-content/uploads/2016/01/Happy-Human.jpg'
This only shows the URL. We cannot look at the image without pasting the URL in a browser. Lets make use of PIL library to open the image and view it here.
from fastdownload import download_url
dest = 'happy.jpg'
download_url(urls[0], dest, show_progress=False)

from fastai.vision.all import *
im = Image.open(dest)
im.to_thumb(256,256)

Code Explanation:
-
from fastdownload import download_url: This line imports thedownload_urlfunction from thefastdownloadlibrary. This function is used to download files from a URL. -
dest = 'happy.jpg': This line sets the destination file name for the downloaded image. In this case, the image will be saved as ‘happy.jpg’ in the current working directory. -
download_url(urls[0], dest, show_progress=False): This line downloads the image from the URL aturls[0]and saves it to the file specified in thedestvariable. Theshow_progress=Falseargument disables the progress bar during the download. -
from fastai.vision.all import *: This line imports all the necessary modules from thefastai.visionlibrary, which is part of the FastAI library suite. Thefastai.vision.allmodule provides various functions and classes for computer vision tasks. -
im = Image.open(dest): This line opens the image file specified in thedestvariable using theImage.openfunction from thePIL(Python Imaging Library) module. TheImage.openfunction returns anImageobject representing the image. -
im.to_thumb(256, 256): This line resizes and displays the image represented by theimobject as a thumbnail. Theto_thumbmethod resizes the image while maintaining its aspect ratio and then displays it. The arguments256, 256specify the width and height of the thumbnail.
Now let’s do the same with “sad human photos”:
download_url(search_images('sad humans', max_images=1)[0], 'sad.jpg', show_progress=False)
Image.open('sad.jpg').to_thumb(256,256)
Searching for 'sad humans'


/usr/local/lib/python3.10/dist-packages/duckduckgo_search/compat.py:60: UserWarning: ddg_images is deprecated. Use DDGS().images() generator
  warnings.warn("ddg_images is deprecated. Use DDGS().images() generator")
/usr/local/lib/python3.10/dist-packages/duckduckgo_search/compat.py:64: UserWarning: parameter page is deprecated
  warnings.warn("parameter page is deprecated")
/usr/local/lib/python3.10/dist-packages/duckduckgo_search/compat.py:66: UserWarning: parameter max_results is deprecated
  warnings.warn("parameter max_results is deprecated")

Our searches seem to be giving reasonable results, so let’s grab a few examples of each of “happy” and “sad” human photos, and save each group of photos to a different folder (I’m also trying to grab a range of key words here):
searches = 'happy human','sad human'
path = Path('happy_or_sad')
from time import sleep

for o in searches:
    dest = (path/o)
    dest.mkdir(exist_ok=True, parents=True)
    download_images(dest, urls=search_images(f'{o} photo'))
    sleep(10)  # Pause between searches to avoid over-loading server
    download_images(dest, urls=search_images(f'{o} face'))
    sleep(10)
    download_images(dest, urls=search_images(f'{o} image'))
    sleep(10)
    resize_images(path/o, max_size=400, dest=path/o)
Searching for 'happy human photo'
Searching for 'happy human face'
Searching for 'happy human image'


/usr/local/lib/python3.10/dist-packages/PIL/Image.py:996: UserWarning: Palette images with Transparency expressed in bytes should be converted to RGBA images
  warnings.warn(


Searching for 'sad human photo'
Searching for 'sad human face'
Searching for 'sad human image'
Code Explanation:
-
searches = 'happy human', 'sad human': This line defines two search terms, “happy human” and “sad human,” which will be used for image searches. -
path = Path('happy_or_sad'): This line sets thepathvariable to aPathobject representing the directory where the downloaded images will be saved. The directory is named ‘happy_or_sad’. -
from time import sleep: The script imports thesleepfunction from thetimemodule, which will be used to introduce delays between consecutive image searches. - The
forloop iterates over each search term insearches:dest = (path/o): Thedestvariable is set to the directory path where the images for the current search term will be saved. eg: ‘happy_or_sad/happy human/’ and ‘happy_or_sad/sad human/’dest.mkdir(exist_ok=True, parents=True): The directory specified indestis created if it does not exist already.download_images(dest, urls=search_images(f'{o} photo')): Thedownload_imagesfunction is called to download images related to the search term with “photo” in the query (e.g., “happy human photo”). The downloaded images are saved in the directory specified bydest.sleep(10): The script pauses for 10 seconds before the next download to avoid overloading the server.- The same process is repeated for “face” and “image” queries (i.e.,
download_images(dest, urls=search_images(f'{o} face'))anddownload_images(dest, urls=search_images(f'{o} image'))), with 10-second pauses between each search.
resize_images(path/o, max_size=400, dest=path/o): Finally, after downloading all the images for each search term, theresize_imagesfunction is called to resize all the images in the directory specified bypath/oto a maximum size of 400 pixels.
Some photos might not download correctly which could cause our model training to fail, so we’ll remove them:
failed = verify_images(get_image_files(path))
failed.map(Path.unlink)
len(failed)
3
Code Explanation:
-
failed = verify_images(get_image_files(path)): This line first uses theget_image_filesfunction from thefastai.vision.allmodule to get a list of image file paths in the directory specified by thepathvariable. Then, theverify_imagesfunction is called on this list to check for corrupted or invalid images. Thefailedvariable will contain a list of file paths of images that failed the verification. -
failed.map(Path.unlink): This line iterates over each file path in thefailedlist and calls theunlinkmethod on eachPathobject. Theunlinkmethod deletes the file from the file system, effectively removing any corrupted or invalid images. -
len(failed): This line returns the number of images that failed the verification process, representing the number of images that were deleted.
Step 2: Train our model
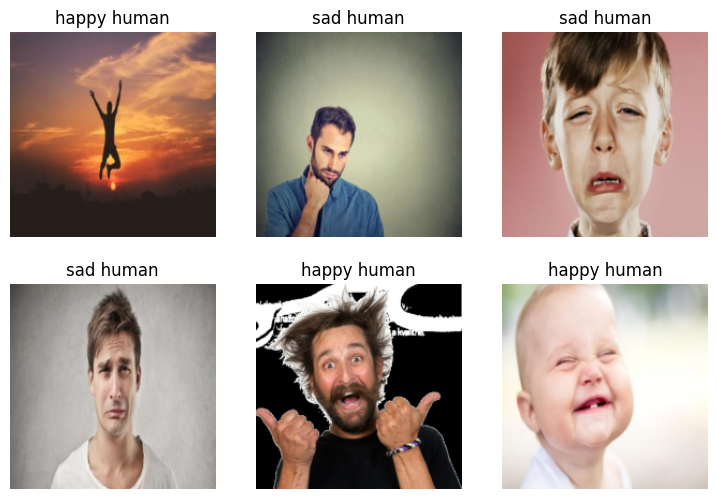
To train a model, we’ll need DataLoaders, which is an object that contains a training set (the images used to create a model) and a validation set (the images used to check the accuracy of a model – not used during training). In fastai we can create that easily using a DataBlock, and view sample images from it:
The below code sets up a data pipeline for image classification, where images are loaded, transformed, and split into training and validation sets. It also displays a batch of images from the dataset for visualization purposes.
dls = DataBlock(
    blocks=(ImageBlock, CategoryBlock),
    get_items=get_image_files,
    splitter=RandomSplitter(valid_pct=0.2, seed=42),
    get_y=parent_label,
    item_tfms=[Resize(192, method='squish')]
).dataloaders(path, bs=32)

dls.show_batch(max_n=6)
Code Explanation:
-
DataBlock: TheDataBlockis a class infastaiused to define the data pipeline for a machine learning task. -
blocks=(ImageBlock, CategoryBlock): This line specifies the types of data blocks used in theDataBlock. In this case, it usesImageBlockfor processing image data andCategoryBlockfor the category labels (target) since it’s an image classification task. -
get_items=get_image_files: This sets the function to get a list of image file paths. In this case,get_image_filesis used to retrieve a list of image file paths from the directory specified in thepathvariable. -
splitter=RandomSplitter(valid_pct=0.2, seed=42): This line defines how to split the data into training and validation sets. TheRandomSplitterrandomly shuffles the data and uses 20% of the data as the validation set, with a random seed of 42 for reproducibility. -
get_y=parent_label: This sets the function to extract the category label (target) from the image file path. Theparent_labelfunction extracts the label based on the parent folder’s name where the image file is located. -
item_tfms=[Resize(192, method='squish')]: This line specifies the data transformations to be applied to each item (image) in the data pipeline. In this case, it resizes each image to a target size of 192x192 pixels using the ‘squish’ method, which may distort the aspect ratio. -
.dataloaders(path, bs=32): This line generates theDataLoadersobject that contains the training and validation data loaders. It loads the data from the directory specified bypathand sets the batch size to 32. -
dls.show_batch(max_n=6): This line displays a batch of images from the data loaders. It shows a maximum of 6 images with their corresponding category labels.
Now we’re ready to train our model. The fastest widely used computer vision model is resnet18. You can train this in a few minutes, even on a CPU! (On a GPU, it generally takes under 10 seconds…)
fastai comes with a helpful fine_tune() method which automatically uses best practices for fine tuning a pre-trained model, so we’ll use that.
The below code trains a vision model using transfer learning on a pre-trained ResNet-18 architecture. It uses the fastai library to set up the data loaders, create the vision learner, and perform fine-tuning for 3 epochs.
learn = vision_learner(dls, resnet18, metrics=error_rate)
learn.fine_tune(3)
/usr/local/lib/python3.10/dist-packages/torchvision/models/_utils.py:208: UserWarning: The parameter 'pretrained' is deprecated since 0.13 and may be removed in the future, please use 'weights' instead.
  warnings.warn(
/usr/local/lib/python3.10/dist-packages/torchvision/models/_utils.py:223: UserWarning: Arguments other than a weight enum or `None` for 'weights' are deprecated since 0.13 and may be removed in the future. The current behavior is equivalent to passing `weights=ResNet18_Weights.IMAGENET1K_V1`. You can also use `weights=ResNet18_Weights.DEFAULT` to get the most up-to-date weights.
  warnings.warn(msg)
Downloading: "https://download.pytorch.org/models/resnet18-f37072fd.pth" to /root/.cache/torch/hub/checkpoints/resnet18-f37072fd.pth
100%|██████████| 44.7M/44.7M [00:00<00:00, 87.8MB/s]
| epoch | train_loss | valid_loss | error_rate | time |
|---|---|---|---|---|
| 0 | 1.072791 | 1.275307 | 0.393939 | 00:21 |
| epoch | train_loss | valid_loss | error_rate | time |
|---|---|---|---|---|
| 0 | 0.515549 | 0.599418 | 0.151515 | 00:28 |
| 1 | 0.332588 | 0.549598 | 0.181818 | 00:29 |
| 2 | 0.251334 | 0.510687 | 0.212121 | 00:28 |
Code Explanation:
learn = vision_learner(dls, resnet18, metrics=error_rate): This line creates a vision learner object namedlearn. It uses thevision_learnerfunction fromfastai.vision.learnerto set up the learner with the following arguments:dls: The data loaders object containing the training and validation data.resnet18: The pre-trained ResNet-18 architecture to be used as the base model for transfer learning.metrics=error_rate: The error rate metric will be used to evaluate the model’s performance during training.
learn.fine_tune(3): This line performs fine-tuning on the model. Thefine_tunemethod is used to fine-tune the pre-trained ResNet-18 model using the data provided by the data loaders (dls). The argument3specifies that fine-tuning will be performed for 3 epochs.
During fine-tuning, the pre-trained ResNet-18 model’s weights are updated on the new dataset (dls) while the earlier layers are “frozen” (not updated) to retain their learned features. This approach leverages the knowledge gained from training on large datasets to improve performance on the specific image classification task at hand.
After running this code, the learn object will contain the trained model, and you can use it to make predictions or further fine-tune the model if needed. Additionally, you can evaluate the model’s performance using different metrics provided by the fastai library.
Step 3: Use our trained model
Let’s see what our model thinks about that happy human we downloaded at the start:
The below code uses a trained fastai vision learner to make prediction on happy or sad and outputs the predicted label along with the probability of the prediction.
predicted_label,_,probs = learn.predict(PILImage.create('happy.jpg'))
print(f"This is a: {predicted_label}.")
print(f"Probability it's a {predicted_label}: {probs[0]:.4f}")
This is a: happy human.
Probability it's a happy human: 0.9999
Similarly lets check out the sad human photo.
predicted_label,_,probs = learn.predict(PILImage.create('sad.jpg'))
print(f"This is a: {predicted_label}.")
print(f"Probability it's a {predicted_label}: {probs[0]:.4f}")
This is a: sad human.
Probability it's a sad human: 0.1502
Code Explanation:
predicted_label, _, probs = learn.predict(PILImage.create('sad.jpg')): This line uses thelearn.predict()method to make a prediction on the image ‘sad.jpg’. The method takes an image as input and returns a tuple containing:predicted_label: The predicted label for the image._: An intermediate output, which is not used in this case.probs: A list containing the probabilities for each class predicted by the model.
-
print(f"This is a: {predicted_label}."): This line prints the predicted label (predicted_label) for the image. The specific label will depend on the classes used during training (e.g., ‘happy human’ or ‘sad human’). print(f"Probability it's a {predicted_label}: {probs[0]:.4f}"): This line prints the probability of the image belonging to the predicted class (predicted_label). The probability is accessed usingprobs[0], which represents the probability value of the first class (index 0) in theprobslist. The:.4fformat specifier is used to display the probability with four decimal places.
predicted_label,_,probs = learn.predict(PILImage.create('photo-1624272949900-9ae4c56397e8.jpeg'))
print(f"This is a: {predicted_label}.")
print(f"Probability it's a {predicted_label}: {probs[0]:.4f}")
This is a: happy human.
Probability it's a happy human: 0.9996
This notebook can be accessed here.
References
Twitter Facebook LinkedIn

Comments